
This is a ‘getting started’ document based on my interpretation of best practices for beginning a new Django project. I’ve written this after going through the four part Django tutorial and reading the excellent Two Scoops of Django twice. The aim for this document is to show you (and remind the future me (( One note of preface: I’m not 100% certain which folder level you need to be in to perform some of the shell commands. ))) how to jumpstart Django without having to go through the first couple chapters of Two Scoops each and every time.
The gist is to:
- Set up folder structure and skeleton files
- Create new virtualenv based on requirements file
- Create a new postgreSQL database
- Start Django server
- Run tests

Pardon the lack of composition in this document. It’s a lab notebook.
1. Set up folder structure and skeleton files
First thing to do is to install the Two Scoops’ project template. We’ll use the project name icratings:
[bash gutter=”false”]
$ django-admin.py startproject –template=https://github.com/
twoscoops/django-twoscoops-project/zipball/master
–extension=py,rst,html icratings
[/bash]
If you use PostgresSQL, which is recommended, then add this line to requirements/_base.txt, which installs the prerequisite psycopg2.extensions:
[bash gutter=”false”]
psycopg2==2.4.6
[/bash]
2. Create a new virtualenv, using the requirements file.
Create a new virtualenv (Note for self: I called mine “django2s”) (( I’m using a virtualenvwrapper command: mkvirtualenv. This is suggested in Two Scoops. )), and use the local requirements file from Two Scoops’ project template.
[bash gutter=”false”]
$ cd path/to/icratings_project/
$ mkvirtualenv django2s -r requirements/local.txt
[/bash]
3. Create a new postgres database
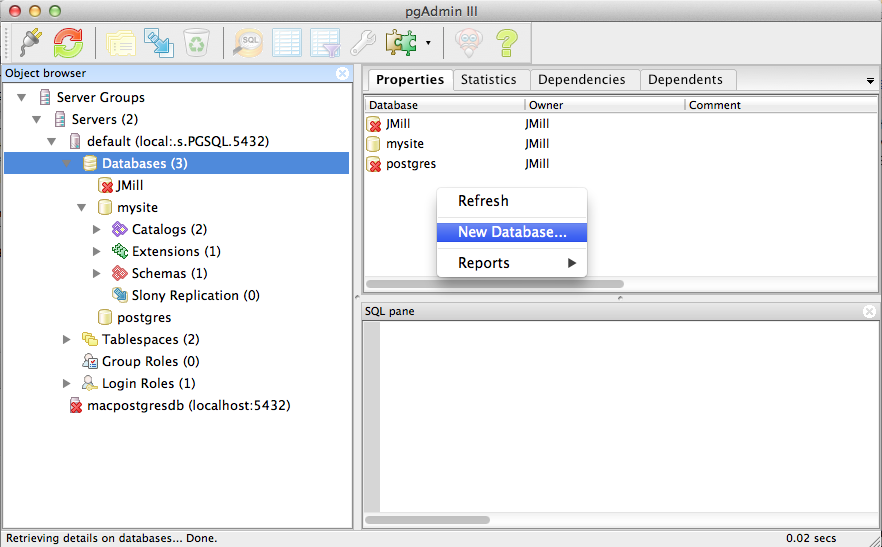
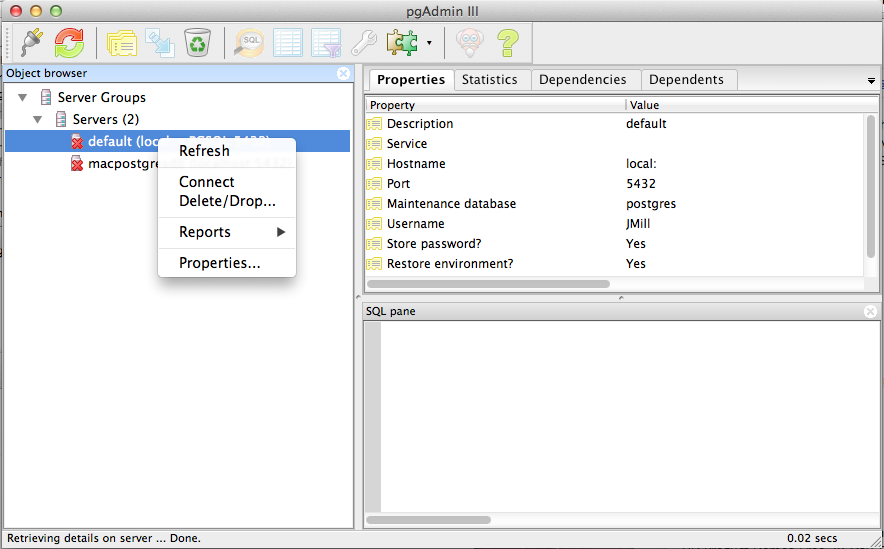
I’m using the GUI-based pgadmin application.
- Connect to the database cluster by accessing the default postgres db.
- Create the new database. Right-click in GUI and create icprojectdb.


Set database info in settings:
[python title=”icratings/icratings/base.py” firstline=”46″]
DATABASES = {
‘default’: {
‘ENGINE’: ‘django.db.backends.postgresql_psycopg2’,
‘NAME’: ‘icprojectdb’,
‘USER’: ”,
‘PASSWORD’: ”,
‘HOST’: ”,
‘PORT’: ”,
}
}
[/python]
Also, put your name and email in ADMINS=.
[python title=”icratings/icratings/local.py” firstline=”26″]
DATABASES = {
‘default’: {
‘ENGINE’: ‘django.db.backends.postgresql_psycopg2’,
‘NAME’: ‘icprojectdb’,
‘USER’: ”,
‘PASSWORD’: ”,
‘HOST’: ‘localhost’,
‘PORT’: ”,
}
}
[/python]
In Terminal, we need to create some tables in the database. This will enable our admin interface, for starters.
[bash gutter=”false”]
$ python manage.py syncdb
[/bash]
If you are prompted to create a superuser, do so. But you can do this later if you want. (( On the command line, type: django-admin.py createsuperuser ))
4. Start Django server
According to the docs and to Two Scoops, use django-admin.py when using multiple settings files, which is what we’re doing. However, I keep getting
ImportError: No module named icratings.settings.local
and this is due to how django-admin.py does not add the present working directory to the python path.
Jacob Jensen wrote me to recommend virtualenvwrapper’s add2virtualenv command (( This command adds the directory to a file name _virtualenv_path_extensions.pth inside the virtualenv’s site-packages directory.)). To use this,
- Activate your virtualenv, if it isn’t already activated.
- Type “add2virtualenv path/to/project/root” (even relative path works)
For my case:
[bash gutter=”false”]
$ workon django2s
$ cd path/to/project
$ add2virtualenv icratings
[/bash]
A warning is returned, but it’s okay:
[bash gutter=”false”]
Warning: Converting "icratings" to "/the/full/path/to/icratings"
[/bash]
With the path added, we can now start the local Django server like a pro:
[bash gutter=”false”]
$ django-admin.py runserver –settings=icratings.settings.local
[/bash]
According to the docs and to Two Scoops, use django-admin.py when using multiple settings files, which is what we’re doing. However, if you don’t do the add2virtualenv trick above, you may get something like:
ImportError: No module named icratings.settings.local
and this is due to how django-admin.py does not add the present working directory to the python path. You can get the server running with this command:
[bash gutter=”false”]
$ python manage.py runserver
[/bash]
Using manage.py limits us a bit because it is not as easy to use our other settings files. Your manage.py file will use a hard-coded settings file.
Regardless of which command you use, once you get the server started, direct your browser to the admin page on the server: http://127.0.0.1:8000/admin/. You’ll be presented with the login screen:  You may be presented with an HttpResponseRedirect warning. Click the “/admin/” link to proceed.
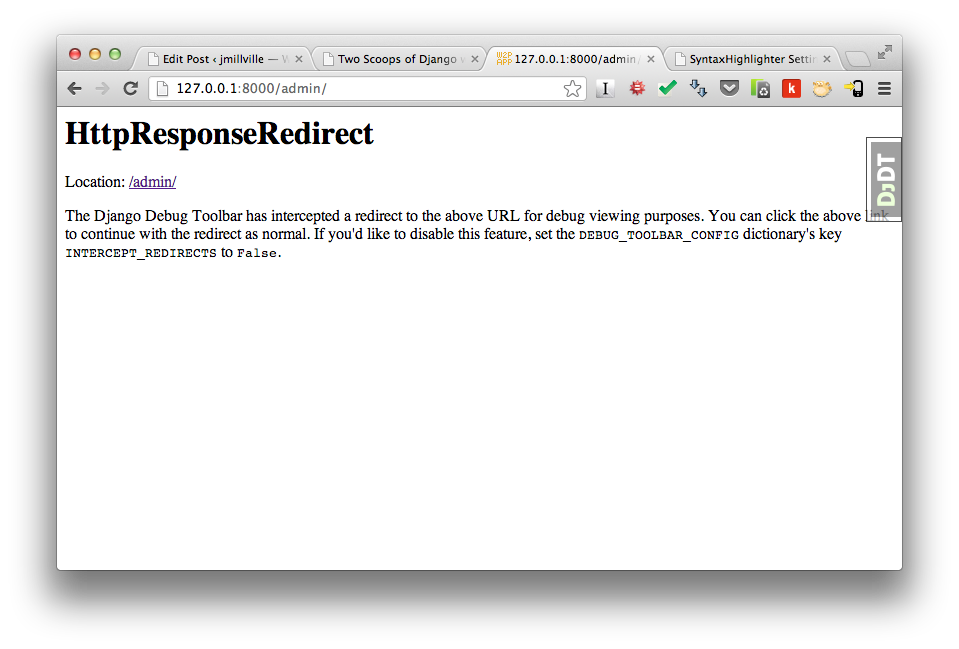
###################
This is the point where I started a new branch in source control so I don’t screw everything up. (Note to self: branch is called “demo app”.
###################
Lets create a new app and call it “popsicles”:
[bash gutter=”false”]$ django-admin.py startapp popsicles[/bash]
Add this app’s name to the LOCAL_APPs section in icratings/settings/base.py:
[python linestart=”192″]
# Apps specific for this project go here.
LOCAL_APPS = (
‘popsicles’,
)
[/python]
Delete popsicles/test.py. In its place (i.e. in popsicles/), create a folder, “tests”, and put an empty file called “__init__.py”. Also put some other files, matching this file/folder structure:
[bash gutter=”false”]
popsicles/
tests/
__init__.py
forms.py
models.py
views.py
[/bash]
If there are other things that need testing beyond forms, models, and views, then extra whatever.py files can be added into the tests/ directory.
Make highlighted changes to settings/test.py:
[python firstline=”6″ highlight=”6,10-11″]
from .base import *
####### TEST SETTINGS
TEST_RUNNER = ‘discover_runner.DiscoverRunner’
TEST_DISCOVER_TOP_LEVEL = SITE_ROOT
TEST_DISCOVER_ROOT = SITE_ROOT
[/python]
Make small addition of ‘.’ to settings/local.py:
[python firstline=”6″]
from .base import *
[/python]
Set the SECRET_KEY env variable via the command line (( This has to be done once during each shell session. )):
[bash gutter=”false”]
$ echo SECRET_KEY=’ch0c0l4t3′
[/bash]
5. Run the tests
Lets construct a placeholder test. In popsicles/tests/models.py:
[python]
from django.test import TestCase
class SimpleTest(TestCase):
def test_basic_addition(self):
"""
Tests that 1 + 1 = 2
"""
self.assertEqual(1 + 1, 2)
[/python]
To run the test (( The command will run all tests in tests/, but we’ve only created one so far.)), type in the shell:
[bash gutter=”false”]
$ coverage run manage.py test –settings=icratings.settings.test
[/bash]
Will run the test we just created, ending with “OK” and destroying the default database. Can then run the coverage tool:
[bash gutter=”false”]
$ coverage html –include="$SITE_URL*" –omit="admin.py"
[/bash]
In the project root ($SITE_URL), enter the folder “htmlcov” and open index.html in a browser to see test coverage. The tests surveyed the entire Django framework plus third party packages in the virtualenv, which is mostly unnecessary.
This command works better, when executed from the project root:
[bash gutter=”false”]
$ coverage html –include=`pwd`/* –omit="admin.py"
[/bash]
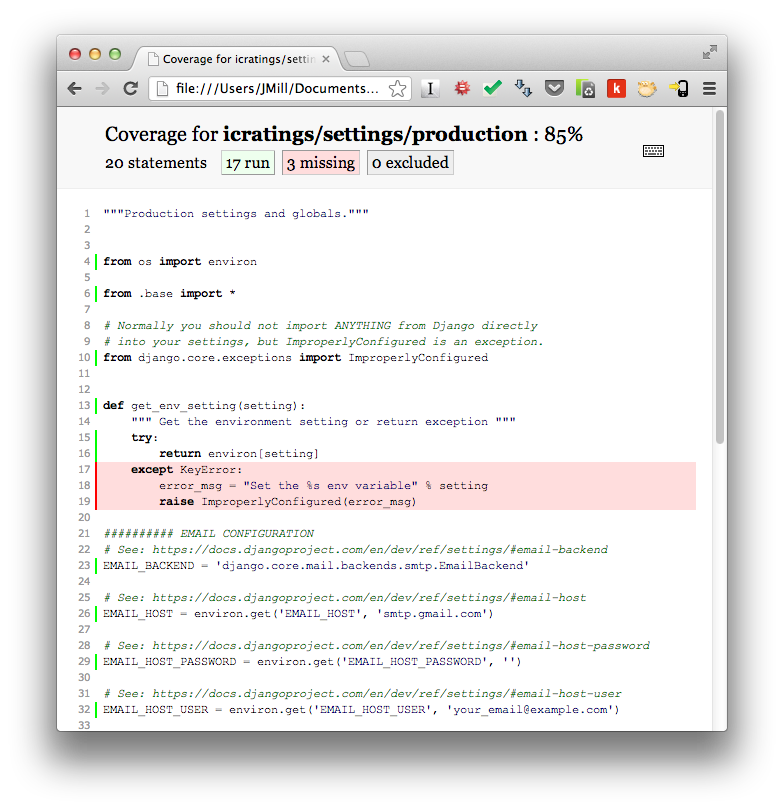
I’m not certain that we need to omit admin.py, but maybe so. [Note: Here is a reference for coverage.py] The test results are below. Notice that we have nearly full coverage of the code. The part for which we do not (yet) have coverage is the icratings/settings/production.py file’s KeyError exception. At this point, that is alright.

Whew. That got us really far. Lets take a break!
Your next step is to flesh out the model of your new app (‘popsicles’, in my case). Remember to do syncdb when you get the model fields written. Good luck!
Update 2013-02-03: Read on to the next post, Onboarding a Django app within a Two Scoops-style project, in which we work to migrate the ‘polls’ app created during the Django 4-part tutorial. We are migrating an existing app because I’m not yet comfortable sharing how to write a model for the ‘popsicles’ app.